
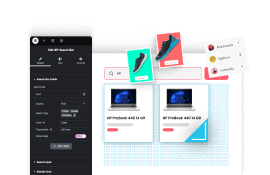


Whether you are selling something offline or online, having a well-organized pricing list on your website makes it easy for users to make the buying decision.
With the Pricing List widget from The Plus Addons for Elementor, you can add beautiful pricing lists to your Elementor website.
Check the Live Widget Demo
Required Setup
- Elementor FREE Plugin installed & activated.
- You need to have The Plus Addons for Elementor plugin installed and activated.
- This is a Premium widget, and you need the PRO version of The Plus Addons for Elementor.
- Make sure the Pricing List widget is activated. To verify this, visit The Plus Addons → Widgets → and search for Pricing List and activate.
Learn via Video Tutorial:

How to Activate the Pricing List Widget?
Go to
- The Plus Addons → Widgets
- Search the widget name and turn on the toggle.

Key Features
- Three Styles – You can select from three predefined styles, Modern, Simple, and Classic.
- Lottiefiles – You can add Lottiefiles to the pricing list.
How to Use Pricing List in Elementor?
Add the Pricing List widget to the page.
Layout
From the Style section, you have to select a pricing list style. Here you’ll find three options –

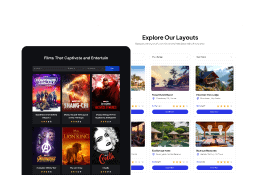
- Modern – With this option, you can create a modern pricing list item with a background image or color.
- Simple – To create a flip box style pricing list item.
- Classic – With this option, you can create a pricing list with an image or Lottiefiles. This can be used to create a food menu pricing list or something similar.
Select the option as per your requirements. Let’s select Modern here.
Content
In the Title field, you have to add the list title.

Then, in the Tag field, you can add relevant tags for the pricing list item, which will be placed above the title.
Note: You can add multiple tags separated by a separator (|).
After that, in the Price field, you have to add the price of that specific item.
In the Description section, you can add a description.
Extra Option
From the Box Align dropdown, you can set the pricing box alignment to Left, Center, or Right.

Image
From Icon Type, you can select the icon type.
Note: This tab shows only when Classic style is selected in the Layout tab.
Here you’ll find two options –
- Image – In this option, you can use an image for the content.
- Lottie – In this option, you can use Lottie animation icons for the content.
Based on your selection, you’ll find different options to add the content.

From the Image section, you can select an image for the Pricing List content.
From the Right Space section, you can manage the image and content spacing.
The Image Resolution dropdown allows you to select the appropriate image size.
After that, from the Image Shape dropdown, you can select the shape of the pricing image. Here you’ll find three options –
- None – Shows the image in its original shape.
- Rounded – Gives the image slightly rounded corners.
- Circle – Turns the image into a circle.
From the Lottie URL section, you can add a Lottie animation to the number counter using a Lottie file URL.

How to Style the Pricing List Widget?
You’ll find all the styling options in the Style tab to style the Pricing List widget.
Title – From here, you can style the title.

Line – You’ll see this tab only when the Classic style is selected. From here, you can add a line between the title and price. You can also style the line from here.
Tag – From here, you can style the tags of the pricing list item.
Price – From here, you can style the price text.
Description – From here, you can style the description text.
Image – You’ll see this tab only when the image is selected as the icon type for the classic style. From here, you can style the image.
Lottie – You’ll see this tab only when Lottie is selected as the icon type for the classic style. From here, you can style the Lottiefiles.
On Scroll View Animation – This is our global extension available for all our widgets. This adds a scrolling animation as the widget comes into the viewport. You can learn more about this from here.
Learn more about On Scroll View Animation
Advanced options remain common for all our widgets, you can explore all its options from here.